Wednesday, November 23, 2011

Barbie Party: Invitations

Granted, I have a little leg up on the rest of the world when it comes to making invitations. I have no fear of my printer and I can whip up something on the "fly". But, when it came to our Barbie party, I wanted to use the materials I had in my drawer. There are some licensed Barbie invites out there, if you want to buy one.
I had the idea to make a "closet" for our invite, since it was a fashion show theme.

I scored and folded card stock for the folder (closet). I made some Barbie silhouette stickers by printing these on sticker back paper and punching out with a scalloped scrapbook punch.

I had a box of transparency film, from who knows how long ago. Its been a while since I've used a projector! So I decided to give it a try. It seemed shiny and plastic, like our inspiration. I printed the invitations on letter sized transparency film and cut them down to fit the folder.

Next, I sealed them with the Barbie stickers I punched out.
Then I addressed the front of the the folder and slid the pair into a 6x9 cellophane bag I already had.
(You can mail things in cellophane bags. The sticker stamps attach easily.)
I wanted to buy envelopes, but I couldn't rationalize spending $10 on shipping for $6 worth of envelopes. But if I had, I would have bought these: Jam Paper. I could also easily make these into self-mailers, and attach a clear round sticker to both edges to keep the inside from falling out.
Here are the files to make your own Barbie Sel-Mailer invitation at home:
Print this at home. On a letter-size piece of card stock.
Follow these steps:
1. Print the above image out on cardstock, as many invitations as you need plus some extras for mistakes.
2. Open Microsoft Word and make a new document, in landscape orientation with a left margin of 3.25 and a right margin of 3.5. Type up the invitation wording and try to rag it around the Barbie arm/purse.
3. Print out the word document on plain paper. Line in on top of the card stock you printed of the Barbie, hold it over a lamp and see which words need to be pushed down a line. Repeat this process until you have all the wording falling around the Barbie correctly.
4. Load the card stock into the printer, for the word document to be printed on top of the Barbie you've already printed. You may print it wrong a few times before you figure out how to load your tray. Print the invitation wording.
5. After printing, fold the left side of the paper at 3" and right side at 3.25". This gives you a cute self-mailer for your invitation. 
6. You can seal this with a clear sticker tab (Available from Staples, by Avery.)
You can print 1" white circle stickers, see attached or you can use sticker back paper and a decorative hole punch like I did with the attached file.
These are 4x6,  Avery 5410 1" Round Multi-Use Labels
This will print on letter-sized sticker back paper. Then use scalloped hole punch.

Tuesday, November 22, 2011

Barbie Party: Decor, Part II

 I love the Barbie signs I've seen on various blogs. I wanted to incorporate one into our party, but it had to match the house and our unusual color palatte. I had an old round frame (once used for our Sharp & Sally trade show booth) so I spray painted it gold and threw some glitter into it. I used pink wrapping paper as base and tiled 4 printouts of the barbie logo to make the sign. Then I glittered the logo.


I hung the wrapping paper on our armoire and hung the sign as our runway turn-around.

Next, my friend Katherine showed me the "Barbie Box" idea. I had no idea what she was talking about, but then I got online and WOW. I had to adopt this idea.
Here are some excellent examples:

I had originally planned to do a typical red-carpet step and repeat wall for the girls to pose in front of... but this was just too cute to ignore.
Our attempt at the Barbie Box... day 1, spray mount held a bit better than on party day.
I resigned myself that only if a box happened my way would I go to the extra effort, after all--I had found the PERFECT wrapping paper to use for the party decor and the step and repeat. But, as luck would have it. Someone moved in down the street and there were a stack of wardrobe boxes in their recycling. So, my 4-year-old son and I set to transforming it into a "Barbie Box".

I'll begin by saying that I am usually pretty adept in mock up things like a professional. But the Barbie box was a wee bit harder than I anticipated. I have a few recommendations.
1. Do NOT use spray mount. Though I am experienced in the art of comping up 3-d projects, the sheer size and awkward nature of the wrapping paper did not behave as expected. Wrapping it like a birthday present would have been far less bumpy. The spray lost it's hold over the week and got bubbles.
2. I'd either paint the thing or get some of the $1 table cloths and hang them like a curtain on the inside. The outside of the box can be wrapped like a gift, but the inside would look better if it was intentionally rippled or completely flat, like paint.
3. Cellophane, while adorable as a concept over the front of the box proved to be a nightmare with the girls' ever changing poses, creating hot spots all over the place. Giant flash hot spots covered their faces. It was a lot of unneeded pressure. It looked great without it.
Here's our humble box.... which, trust me, was a HIT! It made the party, hands down.
Total cost of the Barbie box was 3 rolls pink wrapping paper ($3.99 each, Wal-Mart or $11.97) and one silver metallic ($3.99 Wal-Mart. The spray mount was a MISTAKE, so just use tape. Basically, it is under $20 and it is worth every penny--the the focal point of the party!

Barbie Party: The Decor!

I had concerns swirling in my head about how to make the party decor festive but still adhere to the unusual color combinations (hot pink for Barbie and red for our red carpet). I found the perfect red and pink wrapping paper that solved my color issue (last blog), but I still wanted more fun decor.

It occurred to me that photos of Barbie all over the house would be a great, colorful unifier. I scavenged these great images off the web and printed them for all my extra photo frames. This got a great reaction. It was pretty funny.
Here are the images I found:


Saturday, November 5, 2011

Barbie Party Favors: Fabric Headbands

My strips are 2.5" x 45" across
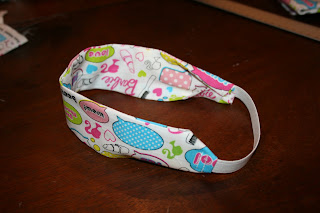
I saw this cute Barbie licensed fabric on the internet one night and thought some headbands would make cute party favors. I ordered a yard of fabric from amazon.

1. Cut 2.5" strips across fabric from selvage to selvage.
2. Sew 2 pieces together on wrong side, fronts facing. Make seams 1/4.
Option: You could cut 1 strip  of 5" x 45" instead of two 2.5" x 45", fold it in half and only make one seam.


Turning tool attaches to inside of tube and helps push fabric inside out.

3. Iron the seams open. Then, iron the tubes so that the fabric is flat, with seams on edge.
Opening the seams with iron makes it easier to iron it flat.
Iron flat with seams on edge.

 4. Cut tubes into three 14" strips. Cut elastic in 6"- 6.5" strips. (I used 6" of fairly tight elastic for my group of 7 year old girls. I'd make it a tad longer for older girls).
6" elastic strips
cut 45" tubes into 14" 
5. Fold in edges of tube (about .25")  and sew elastic to each end.
6. Fold over ends, in to each other and stitch closed.

 7. The final product: